Getting Started
Commercial License Required
This component is licensed under the SpreadsheetImporter Commercial License since version 2.0.0. For details, see LICENSE.md. The version 1.x is licensed under the Apache License 2.0 and remains free of charge but no major updates will be provided.
Deployment Strategy
We recommend different deployment approaches depending on your platform:
- For ABAP systems: Only centralized deployment is possible. Decentralized deployment is not supported for ABAP systems.
- For SAP Business Technology Platform (BTP): Decentralized deployment is recommended, though centralized deployment is also possible.
For decentralized deployment in ABAP, refer to ABAP Component Deployment. For BTP deployment, special considerations are necessary, which are detailed in BTP Deployment. A full BTP deployment example is available in this sample project.
Decentralized Deployment
Decentralized Deployment for ABAP
This method is not possible for ABAP systems. For ABAP, please use Central Deployment instead.
Decentralized Deployment for BTP
For BTP applications, decentralized deployment is the recommended approach.
In decentralized deployment, the component is included directly in each app and deployed with it. For ABAP-specific instructions, refer to ABAP Component Deployment. For BTP-specific considerations, refer to BTP Deployment.
Central Deployment
In centralized deployment, the Spreadsheet Upload component is stored centrally, either in an on-premise ABAP system or in BTP. For detailed instructions, see the Central Deployment page.
Key Features ✨
The Spreadsheet Importer offers several powerful features:
- Multiple Upload Methods: Upload files, drag & drop, or paste data directly
- Paste Functionality (v2.3.0+): Copy data from Excel/Google Sheets and paste directly (Ctrl+V)
- File Paste Support (v2.3.0+): Paste .xlsx files directly from your clipboard
- Wizard Mode: Step-by-step guided import process
- Universal Backend Support: Works with any OData service
- Validation & Error Handling: Comprehensive data validation
Setup
To integrate the ui5-cc-spreadsheetimporter component manually, follow the steps below.
Requirements
- Node.js v16.18.0, v18.12.0, or higher
- npm v8.0.0 or higher
- UI5 CLI v3.0.0 or higher
Setup for Decentralized Deployment
There are two ways to include the component in your application:
Option A: Install from npm
1. Install the component from npm:
2. Add resourceRoots to the sap.ui5 section of your manifest.json:
Version Management
Whenever you update the ui5-cc-spreadsheetimporter module, ensure that the version specified in your manifest.json is up to date. For more information, see Version Namespace.
"resourceRoots": {
  "cc.spreadsheetimporter.v2_4_0": "./thirdparty/customcontrol/spreadsheetimporter/v2_4_0"
}
3. Update your build script in package.json by adding --all:
Option B: Using jsDelivr CDN
For BTP applications (or apps using the index.html bootstrap), you can use jsDelivr CDN to include the component directly without npm installation:
1. Add the CDN resource path to your index.html bootstrap:
<script
  id="sap-ui-bootstrap"
  src="https://sapui5.hana.ondemand.com/resources/sap-ui-core.js"
  data-sap-ui-theme="sap_horizon"
  data-sap-ui-resourceroots='{
    "your.app.namespace": "./",
    "cc.spreadsheetimporter.v2_4_0": "https://cdn.jsdelivr.net/npm/ui5-cc-spreadsheetimporter@1.7.3/dist"
  }'
  data-sap-ui-oninit="module:sap/ui/core/ComponentSupport"
  data-sap-ui-async="true"
  data-sap-ui-frameOptions="trusted"
></script>
Version Specification
Always specify the exact version in the CDN URL (e.g., @1.7.3) to ensure consistent behavior of your application.
For more information on using jsDelivr CDN, see the jsDelivr documentation.
Using the Component in your App
1. Add componentUsages to the sap.ui5 section of your manifest.json (same for both options):
Version Management
Whenever you update the ui5-cc-spreadsheetimporter module, ensure that the version specified in your manifest.json is up to date. For more information, see Version Namespace.
2. Optional: Handle the "component does not exist" error
If you encounter the error component does not exist when deploying to an SAP system (S/4 On-Premise or SAP BTP ABAP environment), add the following to your manifest.json:
Resource Roots Path
Ensure the resourceRoots path is correct, especially considering the lowercase format change since version 0.34.0.
Setup for Central Deployment
1. Deploy the component using your desired version. Refer to Central Deployment for detailed instructions.
2. Add componentUsages to the sap.ui5 section of your manifest.json:
Version Management
Whenever you update the ui5-cc-spreadsheetimporter module, ensure that the version specified in your manifest.json is up to date. For more information, see Version Namespace. Also, ensure the version is available in the system.
Starting with the Fiori Elements Application
OData Version Differences
There are different implementations for Fiori Elements depending on the OData version.
If something may not work as expected, set the debug property to true in the component configuration. This will log additional information to the console that can help diagnose the issue.
Search for Spreadsheet Importer in the console output to find the log entries.
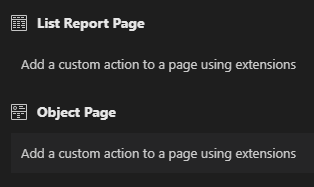
To start the Spreadsheet Upload Dialog, add a button to your Fiori Elements app. The Guided Development extension is a recommended way to add a custom action:
After adding the custom action, implement your custom code using either OData V2 or OData V4. You can also use a controller extension in Fiori Elements. For an example, see the Fiori Elements V4 Example App.
Starting with Fiori Elements (OData V4)
Manifest.json Extension
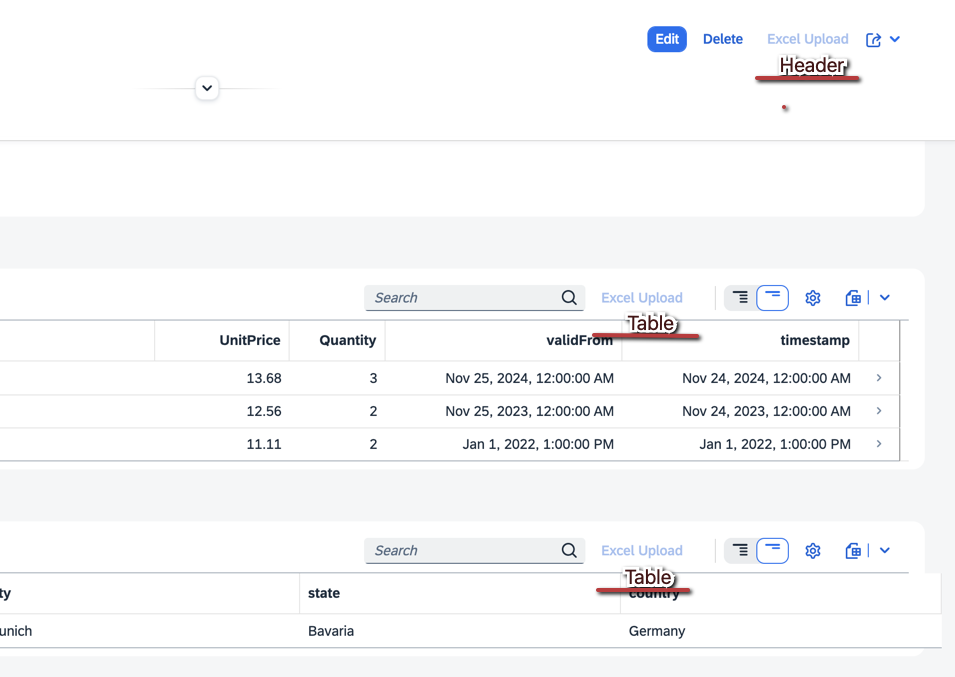
Here is an example of a custom action from the sample app for the object page. This example adds a button to the order items table on the object page. If there are multiple tables, always specify the relevant tableId. By using "enabled": "{ui>/isEditable}", you can automatically disable the button when the page is not in edit mode.
"OrdersObjectPage": {
  "type": "Component",
  "id": "OrdersObjectPage",
  "name": "sap.fe.templates.ObjectPage",
  "options": {
    "settings": {
      "editableHeaderContent": false,
      "entitySet": "Orders",
      "navigation": {
        "Items": {
          "detail": {
            "route": "Orders_ItemsObjectPage"
          }
        }
      },
      "controlConfiguration": {
        "Items/@com.sap.vocabularies.UI.v1.LineItem": {
          "actions": {
            "ObjectPageExtController": {
              "press": "ui.v4.ordersv4fe.ext.ObjectPageExtController.openSpreadsheetUploadDialogTable",
              "visible": true,
              "requiresSelection": false,
              "enabled": "{ui>/isEditable}",
              "text": "Spreadsheet Upload"
            }
          }
        }
      }
    }
  }
}
Custom Code
Using tableId Configuration
It's highly recommended to explicitly specify the tableId in your configuration. The component searches for tables in the view, and sometimes additional tables may appear (e.g., through value helps), which can lead to errors when more than one table is available. Using tableId ensures the component always targets the correct table. Use the UI5 Inspector to find the correct table ID (sap.m.Table and sap.ui.table.Table is supported).
The following code sets the busy indicator, creates the component if it hasn't been created already, and opens the dialog. The context attribute is mandatory to allow the component to access the app's context, including binding paths and the model. You can pass options like context and tableId at runtime using the openSpreadsheetUploadDialog method. This is useful when opening the dialog for specific tables (see TableSelector).
openSpreadsheetUploadDialog: async function (event) {
  this.editFlow.getView().setBusyIndicatorDelay(0);
  this.editFlow.getView().setBusy(true);
  this.spreadsheetUpload = await this.editFlow.getView()
    .getController()
    .getAppComponent()
    .createComponent({
      usage: "spreadsheetImporter",
      async: true,
      componentData: {
        context: this,
        tableId: "ui.v4.ordersv4fe::OrdersObjectPage--fe::table::Items::LineItem-innerTable"
      },
    });
  this.spreadsheetUpload.openSpreadsheetUploadDialog();
  this.editFlow.getView().setBusy(false);
}
Example
See the live demo at https://livedemo.spreadsheet-importer.com/.
Starting with Fiori Elements (OData V2)
Manifest.json Extension
Here is an example of a custom action from the sample app for the object page.
"extends": {
  "extensions": {
    "sap.ui.controllerExtensions": {
      "sap.suite.ui.generic.template.ObjectPage.view.Details": {
        "controllerName": "ui.v2.ordersv2.ext.controller.ObjectPageExt",
        "sap.ui.generic.app": {
          "Orders": {
            "EntitySet": "Orders",
            "Sections": {
              "Items::com.sap.vocabularies.UI.v1.LineItem": {
                "id": "Items::com.sap.vocabularies.UI.v1.LineItem",
                "Actions": {
                  "spreadsheetImporter": {
                    "id": "spreadsheetUploadButton",
                    "text": "Spreadsheet Upload",
                    "applicablePath": "ui>/editable",
                    "press": "openSpreadsheetUploadDialog",
                    "requiresSelection": false
                  }
                }
              }
            }
          }
        }
      }
    }
  }
}
Custom Code
openSpreadsheetUploadDialog: async function (event) {
  this.getView().setBusyIndicatorDelay(0);
  this.getView().setBusy(true);
  this.spreadsheetUpload = await this.getView()
    .getController()
    .getOwnerComponent()
    .createComponent({
      usage: "spreadsheetImporter",
      async: true,
      componentData: {
        context: this,
        tableId: "ui.v2.ordersv2::DetailsPage::Items::Table"
      },
    });
  this.spreadsheetUpload.openSpreadsheetUploadDialog();
  this.getView().setBusy(false);
}
Deployment of Your App
ABAP Stack
Component Deployment
These instructions apply generally to UI5 Reuse Components, not just the Spreadsheet Importer (see UI5 Reuse Components).
When deploying the component decentrally to an ABAP system, its namespace is registered in the app index, just as it is with central deployment. After deploying decentrally for the first time, you can use the component centrally (see Setup Central Deployment). However, you can only deploy the component decentrally once because the namespace can only exist once in the app index.
This is why we recommend starting with central deployment.
Using the Component Outside the App Index (Standalone Apps)
Running outside Fiori Launchpad? Register the component path in index.html.
Register in index.html:
<script
  id="sap-ui-bootstrap"
  src="resources/sap-ui-core.js"
  data-sap-ui-resourceroots='{
        "your.app.namespace": "./",
        "cc.spreadsheetimporter.v2_4_0": "/sap/bc/ui5_ui5/sap/Z_XUP/thirdparty/customcontrol/spreadsheetimporter/v2_4_0"
    }'
></script>
In manifest.json:
Error: Library/Component Used in Application Does Not Exist
When deploying the app to your ABAP system, you might encounter an error like SAPUI5 library/component cc.spreadsheetimporter.v2_4_0 used in application Z*** does not exist. The application is deployed, but the service returns an error.
To avoid this error, add the following to your manifest.json file:
Resource Roots Path
Ensure the resourceRoots path is correct, especially considering the lowercase format change since version 0.34.0.
This addition should resolve the issue, making resourceRoots unnecessary.
File Unknown When Deploying the App
If the ABAP system does not recognize .ts files, create a .Ui5RepositoryTextFiles file in your app's webapp folder, as described here. An example file is available here and might look like this:
If you use the deploy-to-abap command, you can exclude these files from the deployment by adding the exclude option to your ui5.yaml file:
customTasks:
  - name: deploy-to-abap
    afterTask: replaceVersion
    configuration:
      target:
        url: https://XYZ.sap-system.corp:44311
        client: 200
        auth: basic
      credentials:
        username: env:XYZ_USER
        password: env:XYZ_PASSWORD
      app:
        name: /TEST/SAMPLE_APP
        package: /TEST/UPLOAD
        transport: XYZQ300582
      exclude:
        - .*\.ts
        - .*\.ts.map
        - .*\.js.map
BTP Environment
Running with CAP
If you are using CAP and installing the component as a dependency to your UI5 app, you need to use cds-plugin-ui5 to ensure the UI5 Tooling loads the installed component.
Handling Large File Uploads in CAP
When uploading large spreadsheet files (e.g., files with thousands of entries), you might encounter the error request entity too large. This happens because CAP has a default request size limit.
To resolve this issue, you have two options:
- Increase the request size limit in your CAP application:
Add the following configuration to your package.json file:
You can adjust the 10mb value based on your needs.
- Reduce the batch size in the Spreadsheet Importer component:
Set a smaller batchSize parameter when creating the component:
this.spreadsheetUpload = await this.editFlow
  .getView()
  .getController()
  .getAppComponent()
  .createComponent({
    usage: 'spreadsheetImporter',
    async: true,
    componentData: {
      context: this,
      tableId: 'your-table-id',
      batchSize: 100 // Reduce batch size to handle large files
    }
  });
The default batch size is 1000. Reducing it will create smaller requests that stay within CAP's limits.
Configuring ui5-task-zipper in Your Deployment YAML File
A full example can be found in this sample project.
If you use the ui5-task-zipper task, ensure that ui5-cc-spreadsheetimporter is included in the zip file.
builder:
  customTasks:
    - name: ui5-task-zipper
      afterTask: generateComponentPreload
      configuration:
        archiveName: uimodule
        includeDependencies:
          - ui5-cc-spreadsheetimporter-v2-4-0
The metadata name is defined in the ui5.yaml file of the component.
Metadata Name
Before version 0.34.0, the metadata name was ui5-cc-spreadsheetimporter without the version.
Updating "sap.cloud".service in Spreadsheet Importer manifest.json
When using decentralized deployment, deployment may fail with the following error:
"Service name 'spreadsheetimporter_v2_4_0' and public setting 'true' in embedded manifest.json have to be equal to service name 'xxxxxxx' and public setting 'true' of root manifest.json"
SAP currently does not provide a fix for this.
Workaround 1
Manually update the service name in the manifest.json of the Spreadsheet Importer to match the service name in your app's manifest.json.
To automate this, you can use the custom UI5 Tooling task ui5-task-btp-manifest.
Install the Task
Add the Task to Your ui5.yaml
This task will update the Spreadsheet Importer manifest with the app's service name at this path: dist/thirdparty/customcontrol/spreadsheetimporter/v2_4_0/manifest.json.
Workaround 2
According to a comment from user TravelTechCode, you can try the following deployment sequence:
- Deploy your app without the UI5 Spreadsheet component first.
- Add the UI5 Spreadsheet component and deploy the app again.
This approach avoids deployment errors and allows the component to be accessed in the content explorer.